
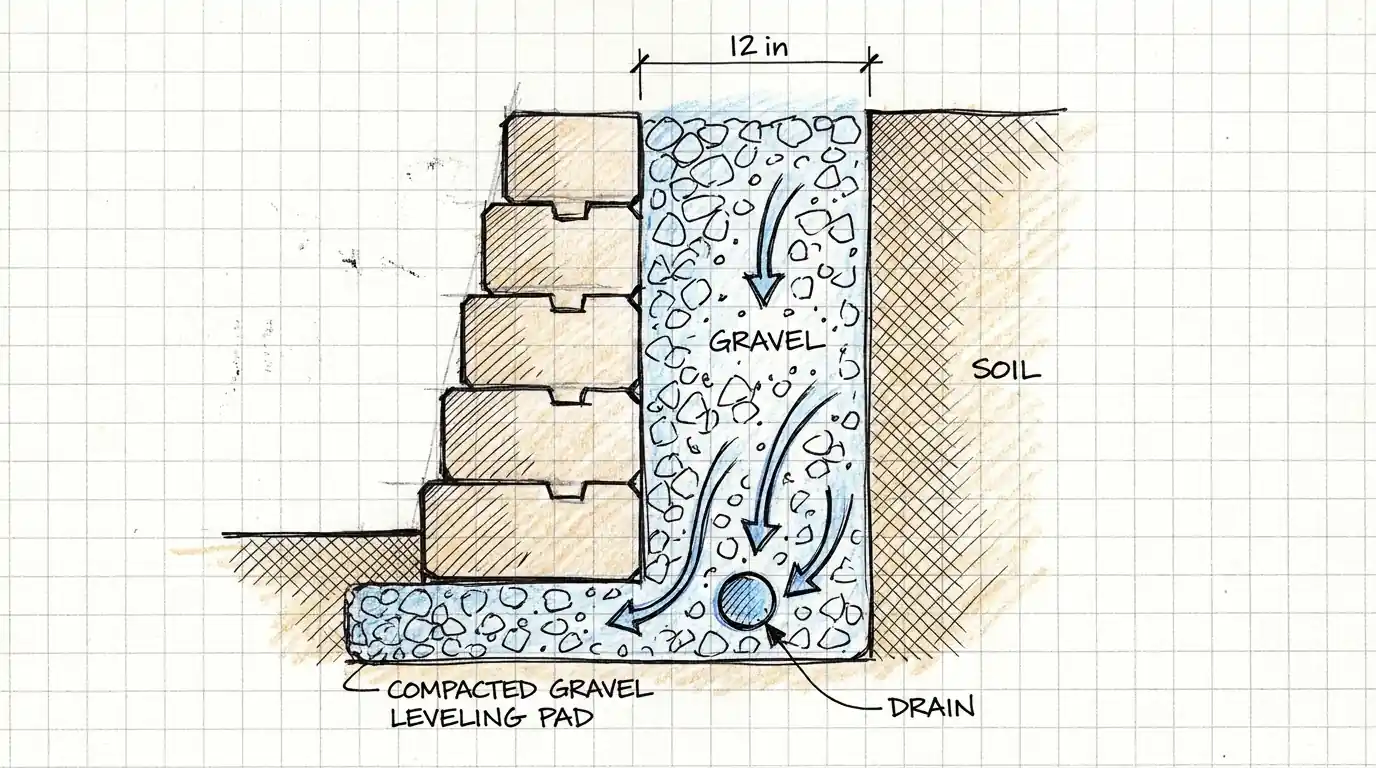
Retaining Wall Gravel Backfill Calculation: Estimating Drainage Columns
Gravel behind a retaining wall is a standing wall of stone, not a flat patio. Multiply wall length (ft) × total wall height (ft) × column width (ft), then divide by 27 to get cubic yards. For a standard 12-inch column, width = 1.0, so the math collapses to length × height ÷ 27. A 30 ft long, 4 ft tall wall needs about 4.4 cubic yards (roughly 6 tons) before waste.
Every gravel calculator on the internet asks for length, width, and depth because it assumes you are covering a driveway or a garden path. Flat. Horizontal. Easy. Your drainage gravel is none of those things. It is a tall, skinny column standing on its edge, sandwiched between the back of your blocks and the dirt you just dug out. The word “depth” stops making sense, and most people freeze right there.
Why the standard gravel formula confuses everyone
Calculators for gravel are built around a horizontal slab of stone:
- Length: how far it runs
- Width: how far across it spreads
- Depth: how thick it is, top to bottom
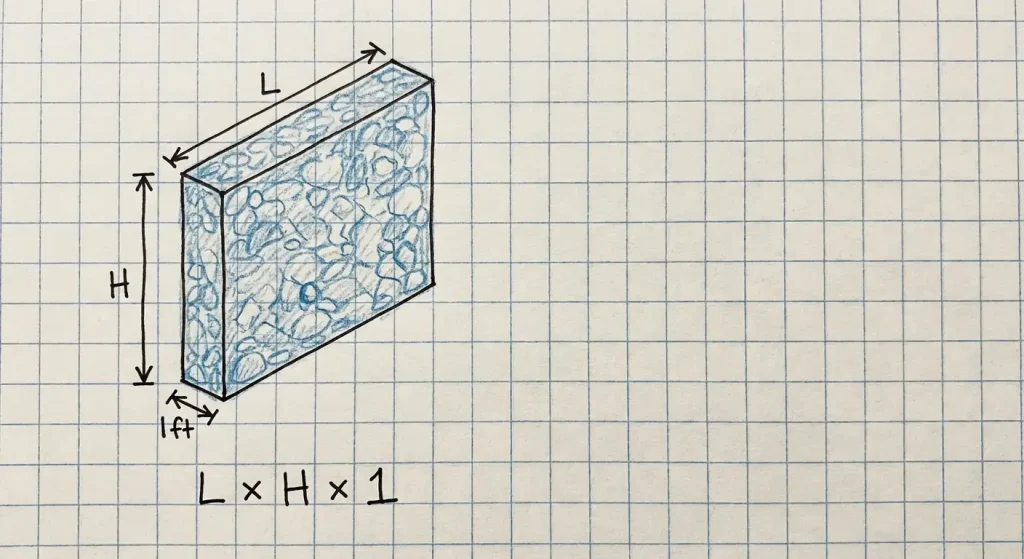
Your drainage column uses the exact same three numbers. They are just pointing in different directions:
- Length: how far the wall runs (same as always)
- Height: how tall the wall is (this replaces “depth”)
- Width/thickness: how far the gravel sticks back into the hillside, usually 12 inches
Nothing about the math changes. Volume is still three dimensions multiplied together. You are simply taking that flat slab of gravel and standing it up on its edge against your wall.
The drainage column formula
Step 1: Get your three numbers in feet
Volume (cubic feet) = Wall Length (ft) × Total Wall Height (ft) × Column Width (ft)
Column width in feet, for the widths people actually use:
- 6 inches = 0.5 ft
- 12 inches = 1.0 ft (the standard)
- 18 inches = 1.5 ft
- 24 inches = 2.0 ft
Step 2: Convert to cubic yards
Cubic Yards = Cubic Feet ÷ 27
Stone is sold by the cubic yard or the ton, never by the cubic foot, so this step is not optional.
Step 3: Add 10% to 15% for waste and compaction
Stone settles when you tamp it, some rolls into the block cores, and some disappears into the trench walls. Order a little extra. Running out halfway up a wall means a second delivery fee for a quarter of a yard of rock. With a 12-inch column, the width is exactly 1.0, so it drops out of the equation entirely:
Cubic yards = wall length × wall height ÷ 27
Another way to say the same thing: every square foot of wall face needs about 0.037 cubic yards of drainage stone. Multiply your wall’s face area by 0.037 and you are done.
A worked example, start to finish
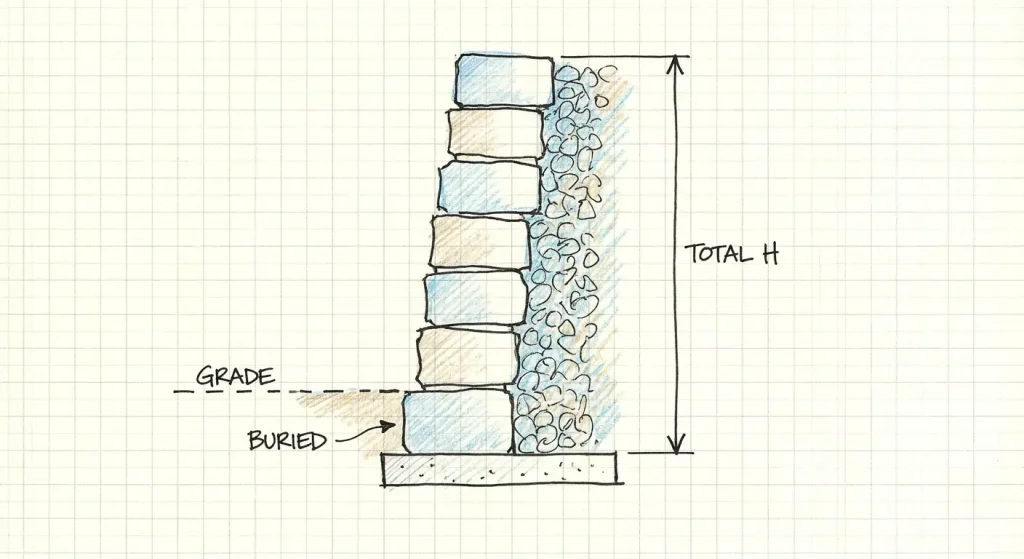
The wall: 30 feet long, 6 courses of 8-inch block, with the bottom course buried. Total height is 4 feet (3.5 ft exposed + 0.5 ft buried). Standard 12-inch gravel column.
- Volume in cubic feet: 30 × 4 × 1.0 = 120 cubic feet
- Convert to yards: 120 ÷ 27 = 4.44 cubic yards
- Add 12% waste: 4.44 × 1.12 = 5.0 cubic yards
- Convert to tons: 5.0 × 1.35 = about 6.75 tons
Order: 5 cubic yards, or 7 tons of clean 3/4-inch angular stone.
For scale on why you should order in bulk: 120 cubic feet is 240 bags of half-cubic-foot stone from the home center. That is a lot of trips and about three times the price.
Cheat sheet: gravel by wall size
All figures assume a 12-inch-wide column, full wall height, before waste. Tons are calculated at 1.35 tons per cubic yard.
| Wall length | Total height | Cubic feet | Cubic yards | Order with +12% | Approx. tons |
|---|---|---|---|---|---|
| 10 ft | 2 ft | 20 | 0.74 | 0.85 | 1.1 |
| 20 ft | 3 ft | 60 | 2.22 | 2.5 | 3.4 |
| 30 ft | 4 ft | 120 | 4.44 | 5.0 | 6.8 |
| 40 ft | 4 ft | 160 | 5.93 | 6.7 | 9.0 |
| 50 ft | 5 ft | 250 | 9.26 | 10.4 | 14.0 |
| 60 ft | 6 ft | 360 | 13.33 | 15.0 | 20.2 |
Washed stone runs roughly 1.2 to 1.4 tons per cubic yard depending on the rock type and how wet it is. Granite #57 is often quoted at 2,410 lb per cubic yard; limestone tends to run heavier. If your supplier sells by weight, ask them for their number instead of guessing.
Mistake #1: Measuring height from the ground up
This is the big one, and it is why people come up short.
A properly built wall has its first course buried below finished grade, commonly about 10% of the wall height, or one full course minimum. Your gravel column runs the entire height of that wall, including the buried part, from the top of the leveling pad all the way up.
So the height you plug into the formula is not the height you see. It is the height from the base pad to the top block.
On a 4-foot wall, forgetting the buried course understates your order by about 12%. On a 50-foot run, that is more than a cubic yard of missing stone.
Walls that are not a simple rectangle
- tepped or terraced walls on a slope: the height changes as you go. Break the wall into 10-foot sections, calculate each one at its own average height, then add them up. Or just use the average height across the whole run for a fast estimate.
- Curved walls: measure the length along the back face of the blocks, not the front. On an outside curve the back is shorter; on an inside curve it is longer. Walk it with a tape or a string.
- Corners: the two legs of an L-shaped wall share gravel where they meet. It is a tiny overlap. Ignore it; it falls inside your waste allowance.
Mistake #2: Measuring 12 inches from the wrong place
The industry guidance from the National Concrete Masonry Association calls for a gravel fill column that is a minimum of 12 inches deep measured from the back of the wall unit, and a minimum of 24 inches deep measured from the wall face. Those are two different requirements, and the second one is the one that catches people.
If your block is a full 12 inches deep, the two rules give the same answer. But most homeowner-grade block is shallower, and then you need more gravel than you thought:
| Block depth | Gravel width behind block | Column width in feet | Cubic yards per sq ft of wall face |
|---|---|---|---|
| 8 in | 16 in | 1.33 | 0.049 |
| 10 in | 14 in | 1.17 | 0.043 |
| 12 in | 12 in | 1.00 | 0.037 |
A 30 ft × 4 ft wall built with 8-inch block needs about 5.9 cubic yards instead of 4.4. That is a 33% difference; the gap between one delivery and two.
Also remember to fill the block cores. Hollow segmental units get filled with the same clean stone, and that volume is on top of the column. A rough allowance of 0.5 to 0.75 cubic feet per square foot of wall face covers most systems, but check your block manufacturer’s spec sheet.
One more layer people forget
The leveling pad under the base course is separate gravel. Figure a trench roughly 6 inches deep and twice the block depth wide, which works out to about 0.04 cubic yards per linear foot. On a 30-foot wall that is another 1.2 cubic yards of compactable base stone, and note that the base pad uses a different material than the drainage column.
What gravel actually goes in the column
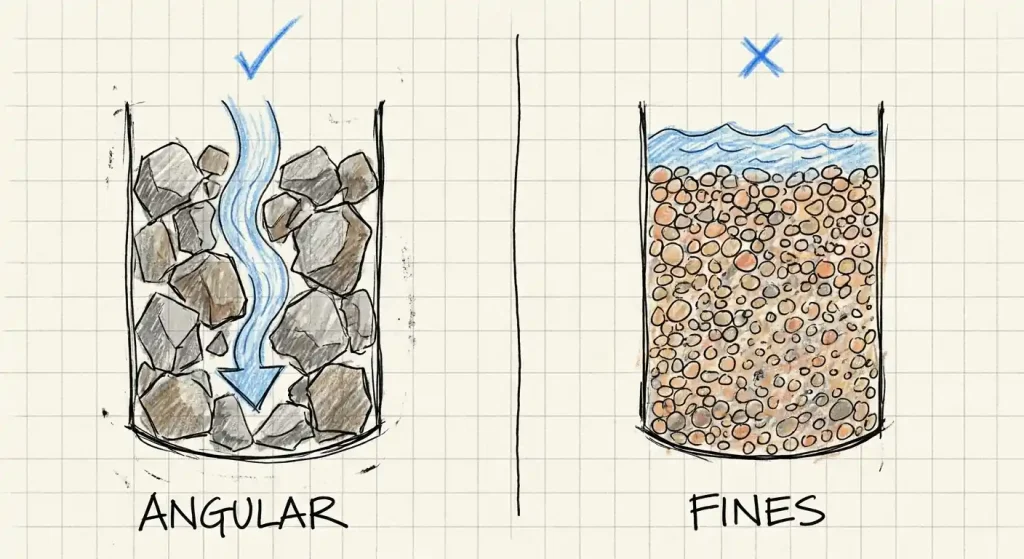
Volume is only half the order. Get the material wrong and the column stops draining within a few seasons. You want clean, angular, open-graded crushed stone, typically #57 or #67, roughly 1/2 to 3/4 inch. Industry gradation guidance allows no more than 5% passing the No. 200 sieve, which is the technical way of saying “almost no dust.”
Do not use:
- Stone dust, screenings, or crusher run; these are designed to pack tight and block water
- Manufactured sand
- Pea gravel: rounded, small, and it migrates and packs
- Native soil, even if it “looks sandy”
The angular shape is the whole point. Sharp edges lock against each other so the column stays put on a slope, while the gaps between the stones stay open so water can fall straight through.
Wrap it in non-woven geotextile fabric. Fine soil particles from the retained earth will migrate into the stone over time and fill those gaps, a process the geosynthetics research literature calls clogging, and it is one of the most common reasons drainage systems quietly stop working. The fabric lets water through and holds the fines back. It costs very little compared to rebuilding a wall.
Put a perforated pipe at the bottom. Design guidance calls for a minimum 3-inch drain pipe at the base of the gravel column, though 4-inch is the practical standard. The column collects water; the pipe carries it somewhere useful. Without the pipe you have built a very expensive bathtub.
Why this column matters more than the blocks
It is tempting to treat drainage stone as the boring part of the budget. It isn’t. Saturated soil behind a wall roughly doubles the lateral load the wall has to resist, because you are no longer holding back just dirt; you are holding back dirt plus a standing column of water pushing outward. That is hydrostatic pressure, and it is what turns a straight wall into a bulging one.
The forensic data backs this up. In a widely cited review of 171 failed reinforced retaining walls, Koerner and Koerner found that 61% had been built with silt or clay backfill rather than free-draining granular material, and that water, either poor internal drainage or poor surface water control, was implicated in the large majority of cases. Most of those walls failed within four years of being built.
Modeling work published in Computers and Geotechnics by Blake and colleagues showed the same thing from the other direction: water pressure behind a wall spikes fast during heavy rain, which is exactly why the drainage path has to already be there and already be open when the storm arrives. Spending an extra $150 on stone is cheap insurance against a wall that leans in year three.
Your ordering checklist
- Measure wall length along the back of the blocks
- Measure total height, including the buried base course
- Check your block depth and set the column width to at least 24 inches minus that depth
- Multiply length × height × width, then divide by 27
- Add 10–15% for waste and compaction
- Add a separate figure for block core fill
- Add a separate figure for the leveling pad (different material)
- Order clean angular #57 or #67 stone — no dust, no pea gravel
- Add non-woven geotextile fabric and 4-inch perforated pipe to the order
Frequently asked questions (FAQs)
How much gravel do I need behind a retaining wall?
About 0.037 cubic yards per square foot of wall face for a standard 12-inch-wide column. Multiply wall length by total wall height to get the face area, then multiply by 0.037. A 120-square-foot wall (30 ft × 4 ft) needs roughly 4.4 cubic yards, or about 6 tons.
Do I use “depth” or “height” in a gravel calculator?
Use your wall height in the calculator’s “depth” field, and your column thickness (usually 1 foot) in the “width” field. The calculator does not care which direction the slab is pointing; it just multiplies the three numbers.
Is 12 inches of gravel behind a retaining wall enough?
Twelve inches measured from the back of the block is the accepted minimum for segmental walls. If your block is shallower than 12 inches, widen the column so the total from the wall face is at least 24 inches. Clay soils, tall walls, or heavy runoff are all good reasons to go wider.
How many tons of gravel is one cubic yard?
Roughly 1.2 to 1.4 tons for washed crushed stone. Use 1.35 as a working average, or ask your supplier for their exact density.
Can I use pea gravel behind a retaining wall?
No. Pea gravel is rounded and small, so it packs tight, migrates downslope, and loses the open voids that let water drain. Use angular crushed stone instead.
Does the gravel column go all the way to the top of the wall?
Nearly. Run it up to within about 6 inches of the top, then cap it with compacted low-permeability soil and a bit of topsoil. That cap keeps surface water from pouring straight down into your drainage column and overwhelming it.
Do timber retaining walls need the same gravel column?
Yes. Timber walls need the same 12-inch column of clean stone and the same drain pipe. Arguably they need it more, trapped moisture rots wood as well as pushing on it.
When should I call an engineer instead of doing this myself?
Most jurisdictions require an engineered design once a wall passes 4 feet in total height, or at any height if it carries a surcharge such as a driveway, pool, or slope above it. Check your local code before you order anything.
Also Read: How to Estimate Settlement and Compaction Loss
The bottom line
The gravel behind your wall is not a patio. It is a wall of stone in its own right, standing on edge behind the one you can see.
Measure the length, measure the full height including what gets buried, set the width to at least 12 inches behind the block, multiply, divide by 27, and add a little extra. That is the whole calculation.
Get the volume right and the material right, and the wall you build this weekend will still be straight in twenty years.
Sources and further reading
- National Concrete Masonry Association / CMHA, Segmental Retaining Walls Best Practices Guide: gravel fill column minimums (12 in. from the back of the unit, 24 in. from the wall face) and gradation limits (max 5% passing the No. 200 sieve).
- CMHA, Segmental Retaining Wall Design (SRW TEC-004): minimum free-draining aggregate thickness and minimum drain pipe diameter.
- Koerner, R.M. & Koerner, G.R. (2013). “A data base, statistics and recommendations regarding 171 failed geosynthetic reinforced mechanically stabilized earth (MSE) walls.” Geotextiles and Geomembranes: backfill quality and water as dominant failure factors.
- Blake, J.R., Renaud, J.-P., Anderson, M.G. & Hencher, S.R. (2003). “Prediction of rainfall-induced transient water pressure head behind a retaining wall.” Computers and Geotechnics: transient pore pressure behavior and drainage requirements.

About the Author
Qazi Raza – Technical Creator & Researcher
Qazi Raza develops construction, engineering, and home‑improvement calculators by researching verified formulas, industry standards, and authoritative reference materials. His tools are built using data from ASTM specifications, ASHRAE guidelines, NEC tables, building codes, and widely accepted engineering textbooks. Each calculator is designed to help homeowners, DIYers, and contractors make accurate, confidence‑based decisions.