
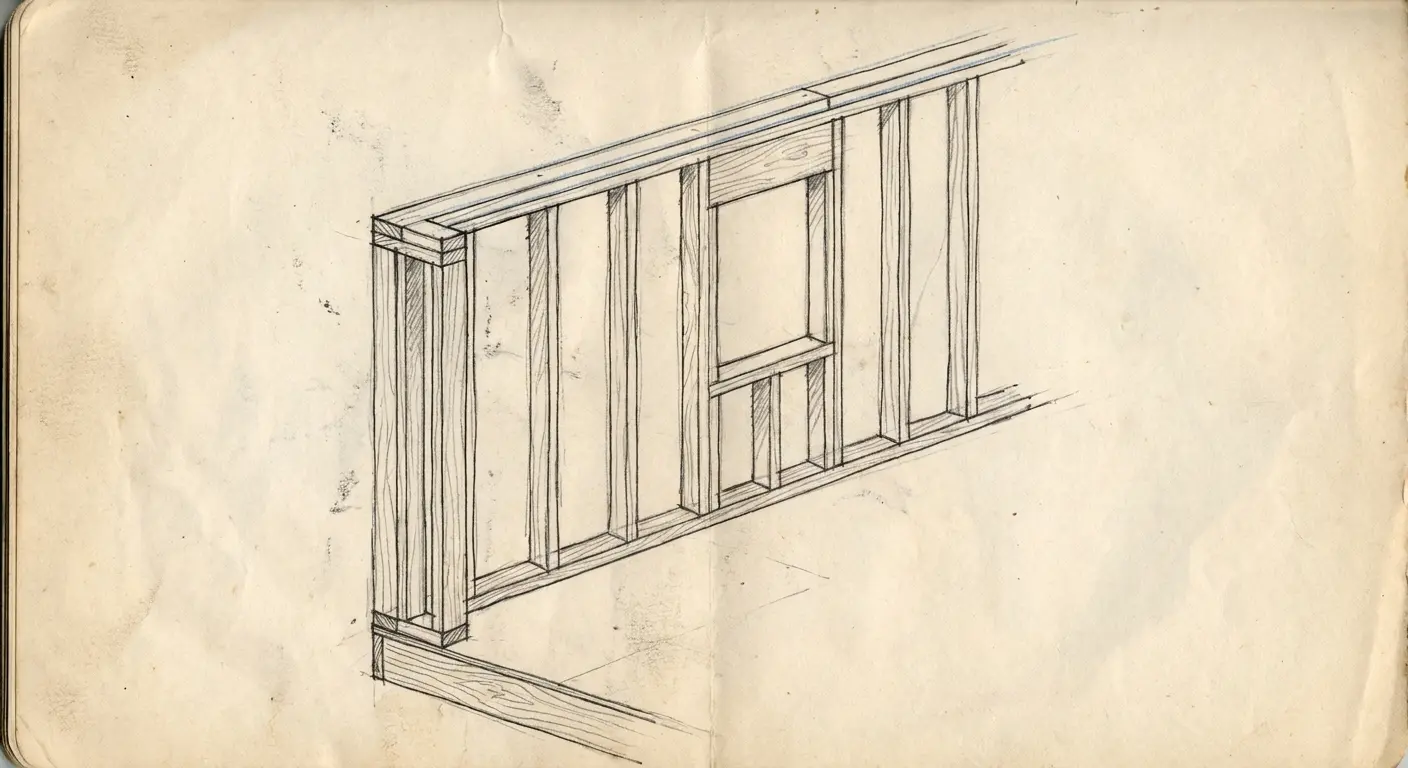
Framing Lumber Math: Calculating Studs, Plates, and Headers for a Wall
Framing lumber math turns one wall measurement into a real shopping list. Count field studs as (wall length in inches ÷ stud spacing) + 1, add extra studs for corners and intersections, add three plate runs (one bottom, two top), then add king studs, jack studs, cripples, and a header at every door and window. Add roughly 10 percent for waste.
Every wall breaks into four counting buckets. Count them in this order and nothing gets missed.
| Bucket | What you count | Quick rule |
|---|---|---|
| 1. Field studs | The evenly spaced studs across the wall | (Length in inches ÷ spacing) + 1 |
| 2. Plates | Bottom plate and double top plate | Wall length × 3 in linear feet |
| 3. Corners and intersections | Extra studs where walls meet | +2 studs per corner, +1 to +2 per tee |
| 4. Openings | Doors and windows | Header + 2 kings + 2 jacks + cripples + sill |
That order matters. Most beginners stop after bucket 1, then run short of lumber on the second trip to the yard.
Wall Anatomy: What Each Piece Does
You count framing pieces better when you know why they exist. A stick-framed wall is a load path. Weight from the roof travels down through the top plate, into the studs, into the bottom plate, and then into the floor or foundation.
Research from the USDA Forest Products Laboratory on the mechanical properties of wood and wood-based materials explains why lumber carries far more load along the grain than across it, which is exactly why studs stand vertically and plates lie flat.
Bottom plate (sole plate)
One flat 2×4 or 2×6 that runs the full length of the wall. It anchors the wall to the floor deck or slab and keeps stud spacing locked in at the bottom. On a slab or any concrete surface, this piece is pressure-treated.
Studs
The vertical members. They carry compression from above and give you nailing surface for sheathing and drywall. Standard spacing is 16 inches on center, with 24 inches on center used in advanced framing.
Double top plate
Two flat members stacked on top of the studs. The first ties the studs together. The second laps over the joints of the first and over intersecting walls, which ties the whole wall system into one continuous ring. This is why a wall needs three plate runs, not two.
Corner post
Where two walls meet, you need extra studs to create a nailing edge for drywall on the inside corner. A traditional three-stud corner uses two extra studs. A California corner (also called a two-stud corner with a drywall clip) uses one extra.
Rough opening framing
At a door or window, the studs that would have been there are cut out, so the load has to travel around the hole.
- King studs: full-height studs on each side of the opening, nailed to the header.
- Jack studs (trimmers): shorter studs nailed to the kings that hold the header up and carry its load down to the bottom plate.
- Header: the beam over the opening that carries roof and floor load across the gap.
- Cripple studs: short studs above the header, and below the sill on windows, that maintain the 16-inch layout.
- Rough sill: the flat member under a window opening.
One detail trips up almost every first-timer: a 2×4 is not 2 inches by 4 inches. It measures 1.5 by 3.5 inches. That 3.5-inch plate thickness changes stud length and wall length math, so read up on nominal versus actual lumber sizing before you cut anything.
Step 1: Count Your Field Studs
Convert the wall length to inches, divide by your spacing, then add one for the closing stud at the far end.
Field studs = (Wall length in inches ÷ On-center spacing) + 1
If the division leaves a remainder, round up before adding one. A partial bay still needs a stud.
How many studs do I need for a 12 foot wall?
A 12-foot wall is 144 inches. At 16 inches on center: 144 ÷ 16 = 9, plus 1 = 10 field studs. At 24 inches on center: 144 ÷ 24 = 6, plus 1 = 7 field studs.
Those numbers are for the flat run only. A 12-foot wall with one outside corner and one door will land closer to 14 or 15 studs once you finish all four buckets.
Stud counts for common wall lengths
| Wall length | Field studs at 16″ OC | Field studs at 24″ OC |
|---|---|---|
| 8 ft | 7 | 5 |
| 10 ft | 9 | 6 |
| 12 ft | 10 | 7 |
| 14 ft | 12 | 8 |
| 16 ft | 13 | 9 |
| 20 ft | 16 | 11 |
| 24 ft | 19 | 13 |
Step 2: Calculate Your Plates
Plate linear feet = Wall length × 3
One bottom plate plus two top plates equals three passes down the wall.
For a 12-foot wall: 12 × 3 = 36 linear feet of plate stock. That is three 12-foot 2x4s, or two 16-foot 2x4s plus a 6-foot cut if you plan the splices.
Splice rules to build into your buying:
- Bottom plate and lower top plate joints must land on the center of a stud.
- Upper top plate joints must be offset from lower top plate joints by at least 4 feet in most residential framing practice.
- Buy the longest plate stock your vehicle and wall length allow. Fewer splices means fewer weak points and less measuring.
On a slab, the bottom plate must be pressure-treated or naturally durable and separated from the concrete.
Step 3: Add Corners and Wall Intersections
| Connection type | Extra studs to add | Why |
|---|---|---|
| Three-stud corner (traditional) | +2 | Backing for interior drywall on both faces |
| Two-stud California corner | +1 | Drywall clips replace the third stud |
| Ladder blocking corner | +0 studs, add 3 blocks | Blocks replace the backing stud |
| Interior wall tee | +2 | Backer studs for the intersecting wall |
| Ladder-blocked tee | +0 studs, add 3 blocks | Same backing, less lumber |
A simple rectangular shed has four corners. Traditional corners add 8 studs to the whole build before you frame a single opening.
Step 4: Frame Every Opening
Each door or window has its own mini lumber list. Work it out per opening, then add the results to your totals.
| Piece | Count per opening | Length |
|---|---|---|
| King studs | 2 | Full stud height |
| Jack studs | 2 | Rough opening height |
| Header | 1 assembly (usually 2 members plus spacer) | Rough opening width + 3 inches |
| Cripples above header | Rough opening width ÷ spacing, rounded up, then +1 | Top of header to top plate |
| Rough sill (windows only) | 1, sometimes 2 | Rough opening width |
| Cripples below sill (windows only) | Rough opening width ÷ spacing, rounded up, then +1 | Bottom plate to sill |
Worked example, one 36-inch door in a 16-inch-on-center wall:
- 2 king studs
- 2 jack studs
- 1 header, cut to 39 inches
- 3 cripples above the header
- Subtract the 2 or 3 field studs that fall inside the opening
Net change: about 5 extra pieces, not 8. Always subtract the field studs the opening removed, otherwise your count creeps high on every wall.
Sizing the header
Header size depends on span, the load above it, the species and grade of your lumber, and your local code. A 36-inch opening in a non-load-bearing shed wall behaves very differently from a 8-foot opening under a roof carrying snow.
Check the lumber span tables for your species and loading condition before you buy header stock, and confirm the result with your local building department.
Engineered options such as LVL and glulam carry longer spans in a smaller depth, and published research on the structural performance of engineered wood products documents how their consistency compares with sawn lumber.
Full Worked Example: 12-Foot Load-Bearing Wall
One exterior wall, 12 feet long, 16 inches on center, one outside corner at each end, one 36-inch door.
| Step | Calculation | Result |
|---|---|---|
| Field studs | (144 ÷ 16) + 1 | 10 |
| Corner extras | 2 corners × 2 studs | +4 |
| Door framing | 2 kings + 2 jacks + 3 cripples | +7 |
| Studs removed by the door | Field studs inside the opening | -2 |
| Total studs | 19 | |
| Plates | 12 ft × 3 | 36 linear ft |
| Header | 39 in, two members plus spacer | 1 assembly |
| Waste factor | 19 studs × 1.10 | Buy 21 studs |
Shopping list: 21 studs at 92 5/8 inches (or 8-foot stock if you are cutting your own), 3 pieces of 12-foot 2×4 for plates with one of them pressure-treated if it sits on concrete, and 2 pieces of 2×8 at 4 feet for the header plus a strip of 1/2-inch plywood spacer.
Run the same numbers through a lumber calculator as a second opinion. Two independent counts that agree is the cheapest quality control in carpentry.
Wall Height Math
A precut stud measures 92 5/8 inches. Add the bottom plate at 1.5 inches and the double top plate at 3 inches and you get 97 1/8 inches of framed height. That gives you an 8-foot ceiling with clearance for the floor and ceiling drywall.
| Target wall height | Stud length | Why |
|---|---|---|
| 8 ft (96 in) | 92 5/8 in | 3 plates take 4.5 in, leaves drywall clearance |
| 9 ft (108 in) | 104 5/8 in | Same plate math, taller stud |
| Shed sidewall, 7 ft | 79 1/2 in | Adjust for your own plate count |
If you buy 8-foot studs instead of precut studs, you will cut 3 3/8 inches off each one. That is a real cost difference across 50 studs, and it is a full afternoon of extra cutting.
Calculating Framing Lumber for a Shed
Sheds are where all four buckets come together. Here is a full count for a 10 by 12 foot shed with 7-foot walls, 16-inch-on-center spacing, one 36-inch door in a 12-foot wall, and one 24-inch window in a 10-foot wall.
Wall layout note: the two 12-foot walls run full length. The two side walls fit between them, so each side wall frames out at 113 inches (120 minus two 3.5-inch plate thicknesses).
| Wall | Field studs | Corner extras | Opening framing | Studs removed | Wall total |
|---|---|---|---|---|---|
| Front, 12 ft, with door | 10 | +2 | +7 | -2 | 17 |
| Back, 12 ft | 10 | +2 | 0 | 0 | 12 |
| Left side, 113 in | 9 | +2 | 0 | 0 | 11 |
| Right side, 113 in, with window | 9 | +2 | +8 | -1 | 18 |
| Total studs | 58 |
Plates for the same shed:
| Wall | Length | × 3 plate runs |
|---|---|---|
| Front | 12 ft | 36 lf |
| Back | 12 ft | 36 lf |
| Left side | 9.42 ft | 28.3 lf |
| Right side | 9.42 ft | 28.3 lf |
| Total plate stock | 128.6 linear ft |
Of that total, 42.9 linear feet is bottom plate and should be pressure-treated if it sits on a slab or a pressure-treated floor frame.
Final shed order with a 10 percent waste factor:
- 64 studs at 79 1/2 inches (58 plus waste)
- 8 pieces of 12-foot 2×4 for top plates, plus 3 for the side walls
- 4 pieces of 12-foot pressure-treated 2×4 for bottom plates
- 2 pieces of 2×6 at 4 feet for the door header
- 2 pieces of 2×6 at 3 feet for the window header
- 1 sheet of 1/2-inch plywood for header spacers and blocking
Waste Factor and Buying Smart
A 10 percent waste factor covers crooked boards, bad cuts, and the pieces you set aside for blocking. On small projects, round that up to 15 percent, because a shed does not have enough total volume to absorb two bad boards.
Cull as you load. Sight down every board at the yard. Reject anything with a crown you cannot use, a twist, or a large edge knot near the middle of the span. Grade markings tell you the strength class you are actually paying for, and learning how to read lumber stamps keeps you from framing a load-bearing wall with utility-grade stock.
Buy plate stock long and stud stock exact. Long plates reduce splices. Precut studs reduce cutting. Those two habits save more time than any other buying decision on a small framing job.
Moisture matters. Lumber shrinks as it dries, and shrinkage across the grain is far larger than along it. Research on moisture content and dimensional change in framing lumber supports the standard advice to sticker and dry your stock under cover before you frame, especially with green or wet-treated material.
Two-Pass Verification Method
Use this before you place an order. It catches the vast majority of counting errors.
- Pass one, count by bucket. Field studs, plates, corners, openings, in that order, wall by wall.
- Pass two, count by drawing. Sketch the wall in elevation at any scale and physically draw every stick. Count the sticks in the drawing.
- Compare. If the two numbers are within one or two pieces, order the higher number. If they are off by more than three, you missed either a corner or an opening. Go back to bucket 3.
Drawing forces you to see the cripples above the header and the backer studs at tees, which are the two pieces that arithmetic alone tends to drop.
Common Counting Mistakes
| Mistake | What happens | Fix |
|---|---|---|
| Forgetting the +1 | One stud short on every wall | Add the closing stud to each run |
| Counting two plates | 33 percent short on plate stock | Always multiply length by 3 |
| Ignoring corner posts | 8 studs short on a simple shed | Add 2 per traditional corner |
| Forgetting cripples | Layout breaks above openings | Count cripples at every header and sill |
| Not subtracting removed studs | Overbuying and clutter | Subtract field studs inside each opening |
| Using nominal dimensions | Walls end up wrong length | Use 1.5 and 3.5 inch actual sizes |
| Skipping the waste factor | Second trip to the store | Add 10 to 15 percent |
Frequently Asked Questions (FAQs)
How many studs are in a 12 foot wall at 16 inches on center?
Ten field studs. Add extras for corners, wall intersections, and any door or window framing in that wall.
Why does a wall need three plates?
One bottom plate anchors the wall. Two stacked top plates tie the studs together and lap over intersecting walls to link the whole structure.
Is 24 inch on center spacing acceptable?
It is widely used in advanced framing, but it depends on load, wall height, sheathing, and local code. Confirm with your building department before you switch.
How wide should a header be?
Cut it to the rough opening width plus 3 inches so it bears fully on both jack studs. Depth depends on span and load, so check span tables.
Do I need a header in a shed wall?
If the wall carries roof load, yes. Some non-load-bearing partitions use a simple flat 2×4. Your local requirements decide this.
How much waste should I plan for?
Ten percent for larger jobs, fifteen percent for small builds like a single shed.
Quick Reference Card
Studs: (Inches ÷ Spacing) + 1
Plates: Length × 3 linear feet
Corner: +2 studs traditional, +1 California
Tee: +2 backer studs
Opening: 2 kings + 2 jacks + 1 header + cripples + sill, minus removed field studs
Header length: Rough opening width + 3 inches
Stud height: Wall height minus 4.5 inches of plates
Waste: +10 to 15 percent
Disclaimer
This article is general educational information about framing lumber quantities, not engineering advice. Structural requirements, header sizes, stud spacing, and fastening vary by location, load, and lumber grade. Always confirm your plan with your local building department and a licensed professional before construction. Follow all permit requirements, manufacturer instructions, and safety practices when working with tools and lumber.

About the Author
Qazi Raza – Technical Creator & Researcher
Qazi Raza develops construction, engineering, and home‑improvement calculators by researching verified formulas, industry standards, and authoritative reference materials. His tools are built using data from ASTM specifications, ASHRAE guidelines, NEC tables, building codes, and widely accepted engineering textbooks. Each calculator is designed to help homeowners, DIYers, and contractors make accurate, confidence‑based decisions.