
Lumber Storage: How to Store Framing Wood to Prevent Warping
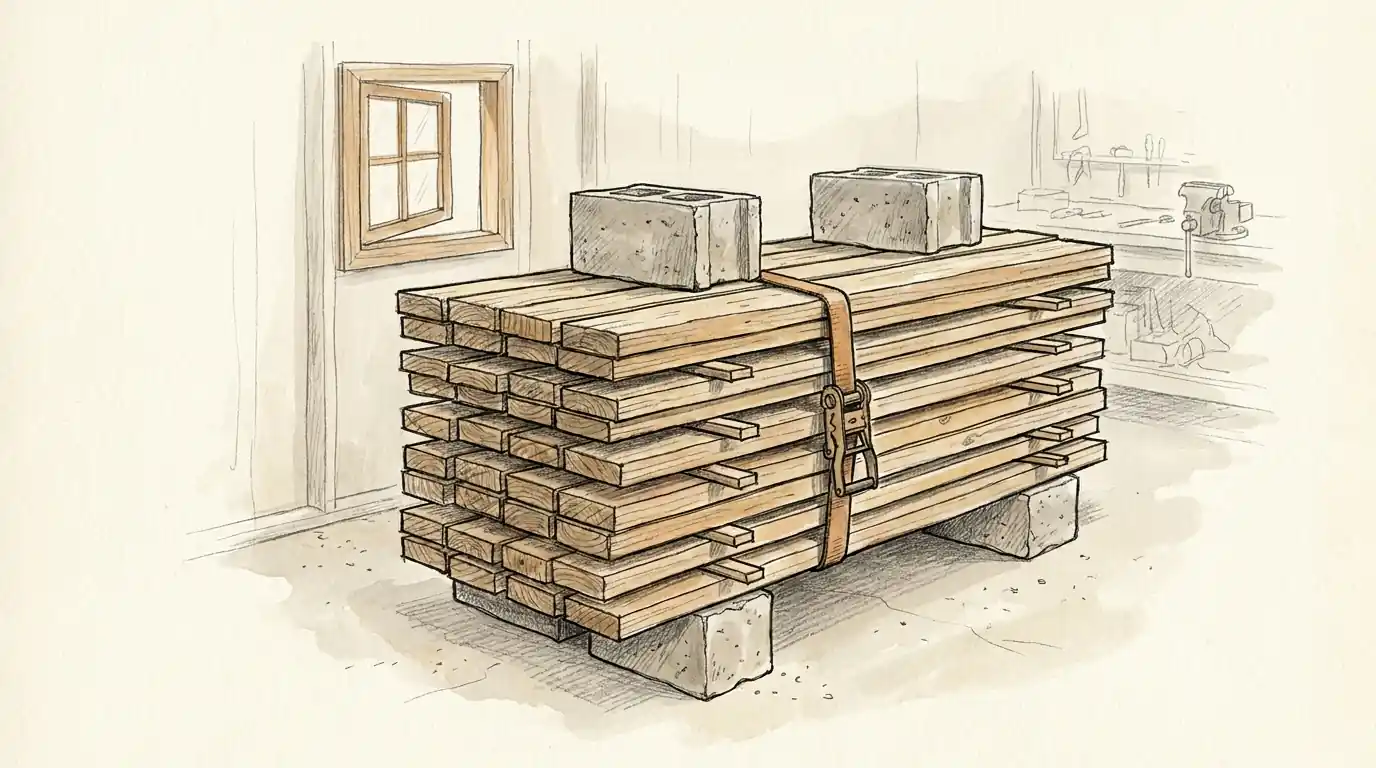
Store framing lumber flat and off the ground. Set it on level supports every 2 feet, place thin sticker strips between each layer, keep the sticker rows stacked directly above each other, then strap the pile and add weight on top. Keep it shaded, dry, and away from damp concrete or soil.
Why Lumber Warps After You Buy It
Wood is hygroscopic. It gains and loses water until it balances with the air around it, and that balance point is called the equilibrium moisture content, or EMC. When the air is damp, boards take on water and swell. When the air is dry, they give up water and shrink.
The problem is that wood does not shrink evenly. It moves roughly twice as much tangentially, along the growth rings, as it does radially, across them, and almost nothing along its length. USDA Forest Products Laboratory research on drying and control of moisture content documents this uneven behavior in detail. Because each board holds a different slice of the log, each one pulls in a slightly different direction as it dries.
Stack boards where one face dries faster than the other, or leave them unsupported in the middle, and that uneven pull becomes a permanent shape. Two things drive it:
- Uneven moisture change. One face wet, one face dry. The wet face swells, the dry face shrinks, and the board curls.
- Unsupported spans. Gravity bends a board while it dries. Once it dries in a bent position, the bend sets.
Green or damp wood can be bent and dried in place, and the bend becomes permanent. Your storage method is not passive. It either holds boards straight or trains them crooked.
Know the Four Shapes of Warp
Before you fix storage, learn to name what went wrong. The National Grading Rule treats warp as any deviation from a flat plane and breaks it into four forms. Each one has a different cause and a different rescue value.
| Type | What it looks like | Usual cause | Can you still use it? |
|---|---|---|---|
| Bow | Curve along the length, across the wide face. The board rocks end to end on a flat floor. | Unsupported spans, uneven weight, sticker rows out of line | Often yes. Cut it shorter or install it with the crown up |
| Crook (crown) | Curve along the length, on the narrow edge | Grain and juvenile wood, plus poor edge support | Yes for short cuts like blocking and cripples |
| Cup | Hollow across the width of the wide face | One face dried or wetted faster than the other | Usually yes in framing. Cup rarely matters in a stud wall |
| Twist | Ends no longer parallel. The board spirals | Spiral or distorted grain, made worse by loose stacking | Rarely. Twist is the one to cull |
Sighting down the edge of each board takes about three seconds. Do it at the store before you load, not at home after you pay. Twist and severe crook are the two you want to leave in the rack, because storage cannot undo them.
Step 1: Read the Grade Stamp First
Your storage plan depends on how wet the lumber was when it was milled. That information is stamped on the board. Under the National Grading Rule for softwood dimension lumber, the moisture designation tells you what you are working with.
| Stamp | Moisture content when surfaced | What it means for storage |
|---|---|---|
| S-GRN | Above 19 percent | Unseasoned. It will shrink noticeably. Sticker it and give it airflow |
| S-DRY or KD | 19 percent or less | The common framing default. Sticker it, and protect it from rain and damp slabs |
| KD-15 or MC15 | 15 percent or less | Driest option. Protect it from gaining moisture back |
S-GRN lumber still needs to lose water, so it needs air moving across every face. KD-15 lumber has already lost its water and its main risk is picking moisture back up. Same garage, opposite problem.
While you are reading the stamp, remember that a 2×4 is not 2 inches by 4 inches. If the actual milled sizes matter for your stack height or your sticker stock, our guide on nominal vs. actual lumber sizing has the full cheat sheet.
Step 2: Pick the Storage Spot
Where you put the pile sets the ceiling on how well it can turn out. The Forest Products Laboratory handbook on storage of lumber makes the point that storage needs change sharply between humid and dry regions, and month to month in places with big seasonal swings.
| Location | Typical condition | Warp risk | Verdict |
|---|---|---|---|
| Conditioned basement or heated shop | Steady, dry, roughly 6 to 9 percent EMC | Low | Best. Boards barely move |
| Unheated garage or shed | Tracks outdoor humidity, dry roof | Moderate | Good, and realistic for most DIYers |
| Covered outdoor rack | Shaded, roofed, open sides | Moderate | Workable for short waits |
| Open outdoors, tarped | Wet and dry cycles, trapped condensation | High | Avoid |
| Directly on soil or grass | Constant moisture from below | Very high | Never |
A concrete slab is a moisture source. Concrete wicks water from the soil underneath and releases it upward as vapor. Bottom boards laid flat on a slab will read wetter than boards two feet up in the same stack. Getting the pile off the floor is not just about puddles.
Sun through a window is uneven drying. A stack with one side in direct afternoon sun and the other in shade is being told to cup. Shade the whole pile or move it.
If you are storing outdoors for more than a few weeks, monthly regional EMC data matters. The FPL research note on equilibrium moisture content of wood in outdoor locations covers 262 United States locations and shows how much the target moves by season.
Step 3: Build a Flat, Dry Foundation
A sagging or uneven base bends every board above it.
- Support every 2 feet. Use 4×4 blocks, concrete blocks, or a pair of level joists. Never fewer than three supports for an 8-foot board.
- Get 4 to 6 inches of air underneath indoors, and 12 inches outdoors. Air has to be able to exit the bottom of the pile, not just enter the top.
- Level it with a real level. Check across the width and along the length. A quarter inch of dip over 8 feet becomes a quarter inch of bow.
- On bare soil, lay black plastic sheeting first. It blocks moisture rising from the ground and keeps grass from growing up into the stack and choking off airflow.
- Keep supports off the wall. Leave 6 inches of clearance so air can move around the pile instead of stalling against the drywall.
A good habit: build the base, then walk on it. If it moves under your weight, it will move under 400 pounds of lumber.
Step 4: Sticker the Stack Correctly
Stickers are the thin strips that separate each layer of boards. They do two jobs at once. They open an air path across both faces of every board, and they carry the weight of the pile above straight down through the stack so that weight holds boards flat instead of bending them.
Sticker specs
- 3/4 to 1 inch thick, 1 to 1.5 inches wide
- Fully dry, straight, and free of bark or pitch
- All the same thickness, which matters more than the exact size
- Long enough to reach past both edges of the pile so you can see the rows as you build
Rip your own from a couple of straight 2x4s and you have enough stickers for a large pile for the price of two studs.
Sticker spacing and row counts
Forest Products Laboratory work on air drying of lumber is direct about this: uniform sticker size, close spacing, and good alignment are the essentials for controlling warp, and thinner stock needs closer spacing than nominal 2-inch material. Here is that translated into counts you can actually lay out.
| Board length | Standard 2x stock at 24 in spacing | Thin or warp-prone stock at 16 in spacing |
|---|---|---|
| 8 ft | 5 rows | 7 rows |
| 10 ft | 6 rows | 9 rows |
| 12 ft | 7 rows | 10 rows |
| 16 ft | 9 rows | 13 rows |
Always put a sticker row at each end. Unsupported overhanging ends dry faster than the middle and hook downward.
Sticker rows must line up vertically, one directly above the other, and directly above the foundation supports. When they line up, the weight of the pile transfers down through the stickers by direct compression and pins the boards flat. When they are offset, that same weight lands in the middle of an unsupported span and bends the boards instead.
The FPL air drying research is blunt about it: 24-inch spacing is safe only if your vertical alignment is close to perfect, and anything less precise contributes to warping. If you are not confident in your alignment, drop to 16-inch spacing. Closer spacing forgives sloppy stacking.
Other stacking rules that pay off
- Group boards by thickness, and keep one thickness per layer. Mixing 1x and 2x material in the same course creates pressure points.
- Put the thickest and heaviest boards on the bottom.
- Leave a 1 to 2 inch gap between boards within a layer for air movement.
- If you plan to use certain boards first, stack them near the top.
Step 5: Strap It and Add Weight
Stickers hold boards flat only if there is downward force. On a short DIY pile there is not much weight above the bottom layers, so you add it.
- Run two ratchet straps over the pile on an 8-foot stack, positioned as close to sticker rows as you can get them. Straps between sticker rows press into unsupported span.
- Retension the straps weekly. This is the step almost everyone skips. As boards lose moisture they shrink, the straps go slack, and the restraint disappears exactly when you still need it. Ratchet straps have a real advantage over metal banding here, because you can simply crank them again.
- Add weight on top. Concrete blocks work well. Roughly one block per 3 to 4 feet of stack length is plenty, so two blocks on an 8-foot pile.
- Do not overload it. Keep the added weight modest, in the range of 50 to 100 pounds for a home-sized pile. Crushing the top boards to flatten the bottom ones is not a trade worth making.
- Spread the load. Lay a dry 2×4 across the top layer and set blocks on that rather than putting a block corner directly onto a single board.
If you see boards starting to move despite this, the fix is more straps and more even weight, not tighter straps in one spot.
Step 6: Cover the Top, Leave the Sides Open
An uncovered pile is exposed to alternate wetting and drying, and FPL air drying research notes that this is exactly what makes the top courses warp, check, and split. So cover the pile, but cover it correctly.
- Lay plywood, roll roofing, or metal roofing over the top with a 6-inch overhang on all sides.
- Slope the cover slightly so water runs off.
- Weight the cover so wind cannot lift it.
- Leave the sides fully open. Do not shrink-wrap or tarp the whole pile.
A sealed tarp traps water vapor coming off the boards and off the ground, then drips condensation back onto the top layer at night. That is a warping machine with a lid.
When to Skip the Stickers
Stickering exists to speed up moisture exchange with the surrounding air. That is what you want when your lumber is wetter than the room. But if your lumber is drier than the space you are storing it in, faster exchange is working against you.
Purdue Extension research on controlling moisture content in stored lumber explains the mechanism: kiln-dried wood held in the wrong temperature and humidity will simply regain moisture, and tightly stacked lumber changes moisture content at its edges first while the middle of the pile responds much more slowly. That slow center is protection.
So use this rule:
| Your situation | Best method |
|---|---|
| S-GRN lumber, or storing in a damp space | Sticker it, open airflow, covered top |
| KD-15 lumber in a dry conditioned shop | Stack it tight and solid, cover the top, skip the stickers |
| KD or S-DRY lumber in a humid garage in summer | Sticker it, and add a dehumidifier if the space is enclosed |
In an enclosed space you can control, aiming for roughly 35 to 45 percent relative humidity keeps framing lumber comfortably in range. A cheap hygrometer on the wall tells you more than guessing does.
How Long to Acclimate, and What to Check
Acclimation is not a fixed waiting period. It is finished when the boards stop changing, which depends on how far they started from your local EMC.
| When | What to do |
|---|---|
| Day 1 | Build the base, sticker the stack, strap and weight it, cover the top. Take a moisture reading on three boards and write it down |
| End of week 1 | Retension straps. Re-read the same three boards. Expect the biggest change now |
| Weeks 2 and 3 | Retension weekly. Re-read. Rotate any board that has started to move to a lower layer where more weight sits on it |
| Before you build | Read again. When two readings a week apart match, the wood has settled |
Moisture targets for framing
- 19 percent or below is the standard maximum for installed framing lumber.
- 15 percent or below is the practical target. Wood installed in the 16 to 19 percent range still has shrinking left to do, which shows up later as nail pops, drywall cracks, and gaps.
A pinless moisture meter costs less than the lumber you are protecting and turns this whole process from guesswork into a number. Read the middle of the board face, not the end grain, and take readings from several boards rather than trusting one.
What a Warped Pile Actually Costs
The math makes the case better than any warning does.
Say you buy 300 studs of 2x4x8 at $4.50 each. That is $1,350 sitting in your garage. Stack them badly for three weeks and losing 30 percent to unusable bow and twist is realistic. That is 90 studs, or about $405, plus a return trip, plus a delay.
Now price the fix:
| Item | Cost |
|---|---|
| Stickers ripped from 2 straight 2x4s | About $9 |
| Two ratchet straps | About $20 |
| Six concrete blocks | About $18 |
| Sheet of plywood for a cover, often on hand | $0 to $35 |
| Total | Under $85 |
Under $85 and one hour of stacking protects a $1,350 order. If you have not ordered yet, run your quantities through our lumber calculator first, then add about 5 percent for cutting waste rather than buying a large cushion of extra boards you will need to store and protect for weeks.
There is a second lesson in that math. Buying lumber far ahead of the build is itself a risk. If your schedule is uncertain, buying closer to the start date is often cheaper than buying early and storing perfectly.
Salvaging Boards That Already Moved
If you are reading this after the damage, sort before you cull. Warp is length-dependent, so a bad 8-foot board is often three good 30-inch pieces.
- Bowed boards. Use them as joists or rafters with the crown up so the load flattens them, or cut them into shorter pieces.
- Crooked boards. Cut them down for blocking, cripples, headers, or short studs. A 4-foot cut from a crooked 8-footer is usually acceptably straight.
- Cupped boards. In most framing, use them as is. Cup across a 3.5-inch stud edge has almost no practical effect.
- Twisted boards. Cut short pieces from the straightest end, or set them aside for blocking. Do not fight a twisted full-length stud into a wall.
- Mildly bent, still damp boards. Restack them at the bottom of a properly stickered and weighted pile. Boards that are still losing moisture can be coaxed back toward flat under load. Boards that are already dry and set will not change.
One caution on the popular internet fix of wetting a cupped board and weighting it in the sun. It can flatten a board temporarily, but you are introducing a new moisture gradient, and the board frequently returns to its cupped shape once it evens out. Save that trick for non-structural pieces.
Quick Checklist
Before you walk away from a fresh lumber delivery:
- Sighted down every board and set aside the twisted ones
- Read the grade stamp so you know if the wood is losing or gaining moisture
- Base is level, supported every 2 feet, and 4 or more inches off the floor
- Plastic sheeting down if the pile sits on soil or a damp slab
- Stickers dry, uniform thickness, and rows at both ends
- Sticker rows lined up vertically and over the base supports
- Boards grouped by thickness, thickest on the bottom
- Two straps snug, positioned at sticker rows
- Modest weight on top, spread across a scrap 2×4
- Top covered with an overhang, sides left open
- Out of direct sun and 6 inches off the wall
- Baseline moisture reading written down, calendar reminder set to retention straps
Technical Basis
Guidance follows USDA Forest Products Laboratory research on air drying, lumber storage, and equilibrium moisture content, plus Purdue Extension work on stored-lumber moisture control. Sticker spacing, alignment, and load restraint reflect published warp-control practice. Grade stamp moisture classes follow National Grading Rule designations for softwood dimension lumber sold in North America.
Disclaimer
This guide is for planning and general information only. Storage results vary with species, grade, climate, and site conditions. Nothing here replaces local building code, the lumber supplier’s handling instructions, or the judgment of a licensed professional. Verify moisture content and structural suitability before installing any board. Lift and stack safely.

About the Author
Qazi Raza – Technical Creator & Researcher
Qazi Raza develops construction, engineering, and home‑improvement calculators by researching verified formulas, industry standards, and authoritative reference materials. His tools are built using data from ASTM specifications, ASHRAE guidelines, NEC tables, building codes, and widely accepted engineering textbooks. Each calculator is designed to help homeowners, DIYers, and contractors make accurate, confidence‑based decisions.